To adjust headlights on a truck, park facing a flat surface, mark the headlight centers, and measure the distance. Use a screwdriver to adjust the headlights up or down accordingly.
Are you having trouble seeing clearly at night while driving your truck? Properly adjusted headlights are crucial for optimal visibility and safety on the road. In this guide, we will walk you through the steps on how to adjust headlights on truck to ensure they are correctly aligned.
By following these simple instructions, you can improve your nighttime driving experience and enhance road safety for yourself and other drivers. Let’s dive in and learn how to adjust your truck’s headlights like a pro.
Credit: www.autozone.com
Contents
- 1 Importance Of Proper Headlight Alignment
- 2 Safety And Legal Considerations
- 3 Tools And Materials Needed
- 4 Preparing Your Truck For Adjustment
- 5 Locating Adjustment Screws
- 6 Adjusting Vertical Aim
- 7 Adjusting Horizontal Aim
- 8 Fine-tuning And Testing
- 9 Troubleshooting Common Issues
- 10 Maintenance And Regular Checks
- 11 Frequently Asked Questions
- 12 Conclusion
Importance Of Proper Headlight Alignment
Proper headlight alignment is crucial for ensuring optimal visibility while driving at night. Misaligned headlights can reduce the driver’s ability to see the road clearly and can also blind oncoming traffic, posing a significant safety hazard. By maintaining the correct alignment, drivers can enhance their safety and that of others on the road.
Safety And Legal Considerations
Ensuring that headlights are properly aligned not only enhances safety but also adheres to legal requirements. Misaligned headlights can result in fines and citations, and even lead to accidents. By understanding the safety and legal considerations of headlight adjustment, truck owners can avoid potential penalties and promote road safety.
Tools And Materials Needed
To adjust the headlights on your truck, you will need a few tools and materials. These include a screwdriver, masking tape, a measuring tape, and an adjustable wrench. With these items on hand, you can easily ensure that your headlights are properly aligned for optimal visibility on the road.
List Of Required Tools
To adjust the headlights on your truck, you will need a few essential tools. These tools are necessary to ensure a successful and accurate adjustment process. Here is a list of the tools you will need:
- Socket wrench set
- Phillips screwdriver
- Masking tape
- Measuring tape
- Level
These tools will help you loosen and tighten the necessary screws, measure the height and alignment, and ensure a level adjustment. Make sure to gather these tools before you start the headlight adjustment process for a smooth experience.
Optional Items For Enhanced Precision
While not essential, these optional items can greatly enhance the precision of your headlight adjustment. Consider using them to achieve the best possible results:
- Torque wrench
- Headlight aiming tool
- Assistants
A torque wrench will allow you to tighten the screws to the manufacturer’s recommended specifications, ensuring the correct tension. A headlight aiming tool can help you achieve a precise alignment, especially for complex headlight assemblies. Having an assistant to help you during the adjustment process can also make it easier to check the alignment from different angles.
By having these optional items at your disposal, you can fine-tune the adjustment process and achieve optimal results. Remember, while not necessary, they can make a noticeable difference in the overall accuracy and alignment of your truck’s headlights.
With the necessary tools and optional items ready, you are now fully equipped to adjust the headlights on your truck. Follow the proper steps and techniques to ensure proper visibility and safety while driving at night.
Preparing Your Truck For Adjustment
Get your truck ready for adjusting headlights by parking on a flat surface facing a wall. Measure and mark the vertical and horizontal centerlines before using the adjustment screws to align the headlights properly. Regularly check and adjust the headlights for optimal visibility and safety on the road.
1. Finding Level Ground
Ensure the truck is parked on a flat, level surface for accuracy.
2. Measuring And Marking The Correct Headlight Height
Use measuring tape to determine the correct height for your headlights.
Before adjusting your truck’s headlights, it’s crucial to follow these steps to ensure accurate and effective results.
- Park the truck on a flat, level surface.
- Turn on the headlights to identify the current alignment.
- Check the truck’s owner manual for specific instructions.
Locating Adjustment Screws
Adjusting the headlights on your truck is essential for optimal visibility and safety on the road. One of the first steps in this process is locating the adjustment screws. These screws, typically found on the headlight assembly, allow you to fine-tune the position of your headlights.
By properly aligning them, you can ensure that your truck’s headlights are aimed correctly, providing you with the best illumination possible.
Identifying Horizontal And Vertical Adjusters
To adjust your truck’s headlights, you need to locate the horizontal and vertical adjusters. These adjusters are usually accessible from the back of the headlight assembly or through the engine bay. Here’s how you can identify them:
1. Horizontal Adjuster: The horizontal adjuster is responsible for moving the headlights left or right. It allows you to align the headlights with the center of the road. Look for a screw or bolt labeled “H” or “Horiz” on the headlight assembly.
2. Vertical Adjuster: The vertical adjuster controls the up and down movement of the headlights. It helps you adjust the beam height, preventing blinding oncoming drivers. Search for a screw or bolt labeled “V” or “Vert” on the headlight assembly.
Remember, the location and labeling of these adjusters may vary depending on your truck’s make and model. Consulting your vehicle’s owner’s manual can provide specific instructions for your truck.
Tips For Different Truck Models
Each truck model may have its own unique way of adjusting the headlights. Here are some general tips to keep in mind:
1. Ford F-150: For Ford F-150 trucks, the horizontal adjuster is usually located on the side of the headlight assembly, while the vertical adjuster can be found on the top or bottom. Use a screwdriver or socket wrench to make the necessary adjustments.
2. Chevrolet Silverado: On Chevrolet Silverado trucks, you can access the horizontal adjuster from the back of the headlight assembly. The vertical adjuster is often located on the side. Use a suitable tool, such as a Torx or Allen wrench, to adjust the headlights.
3. Dodge Ram: Dodge Ram trucks typically have the horizontal and vertical adjusters accessible from the back of the headlight assembly. Look for screws or bolts labeled accordingly, and use the appropriate tool to adjust the headlights.
Always take precautionary measures and consult your truck’s owner’s manual for the exact location and adjustment procedures specific to your vehicle. Properly adjusted headlights not only enhance your visibility but also ensure the safety of everyone on the road.
Remember to test your headlights after making adjustments to ensure they are aligned correctly.
Adjusting Vertical Aim
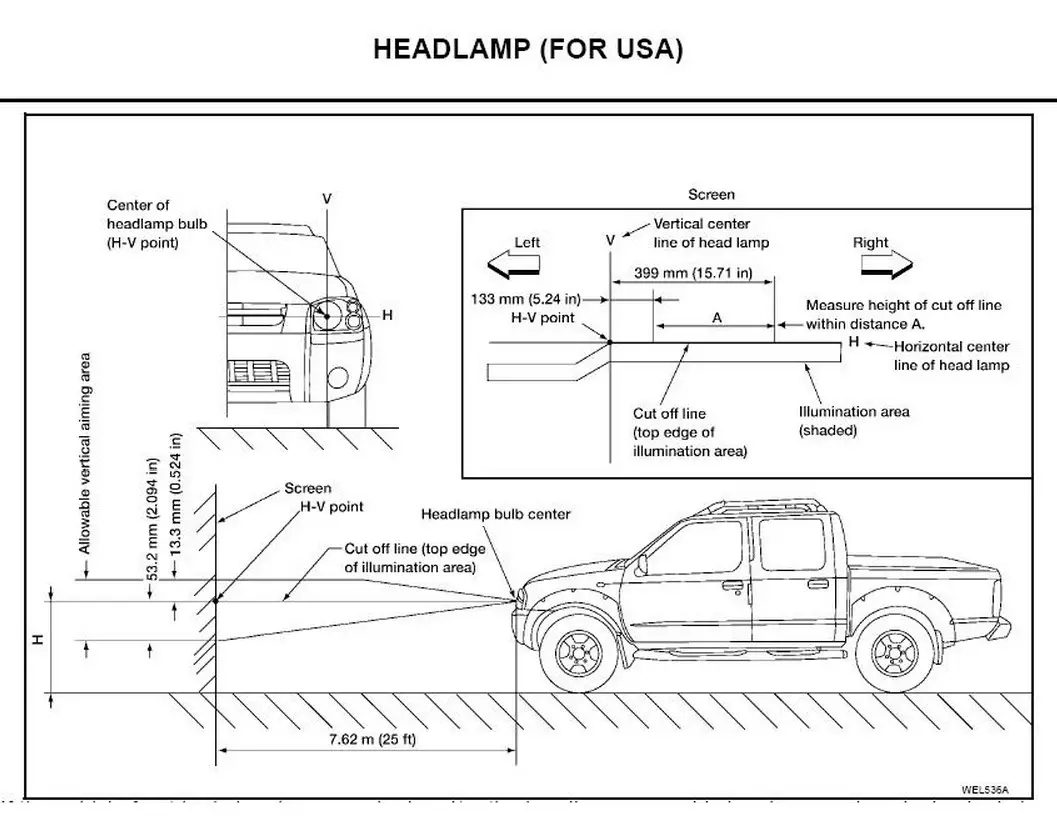
To adjust the headlights on a truck, start by parking the vehicle on a level surface facing a wall. Measure and mark the wall at the same height as the headlights. Then, back the truck up 25 feet and adjust the vertical aim screws until the beams align with the marks.
If your headlights are aimed too high or too low, they can cause visibility problems for you and other drivers on the road. In this section, we will go through the step-by-step process of adjusting the vertical aim of the truck’s headlights –
Step-by-step Vertical Adjustment
Adjusting the vertical aim of your truck’s headlights can be done in a few simple steps. Here is a step-by-step guide to help you through the process:
- Before starting the adjustment process, park your truck on a level surface and make sure that the headlights are turned on.
- Locate the adjustment screws for the vertical aim of your headlights. These screws are usually located on the back of the headlight housing or on the top of the housing.
- Using a screwdriver, turn the screws to adjust the height of the beam. Turning the screw clockwise will lower the beam, while turning it counterclockwise will raise the beam.
- Adjust the beams to the desired height by checking the alignment on a wall or garage door.
- Repeat the process for the other headlight.
Checking Vertical Alignment
After adjusting the vertical aim of your truck’s headlights, it is important to check the alignment to ensure that they are properly adjusted. Here is a simple process to follow:
- Find a flat surface that is perpendicular to a wall or garage door.
- Park your truck about 25 feet away from the wall or door, and make sure that it is on a level surface.
- With the headlights turned on, mark the vertical and horizontal centerlines of the beams on the wall or door using tape.
- Back up your truck about 10 feet and check the alignment of the beams. The center of the beams should be at or below the horizontal centerline and slightly to the right of the vertical centerline.
- If the beams are not aligned properly, adjust them using the steps outlined above.
By following these simple steps, you can adjust the vertical aim of your truck’s headlights and ensure that they are properly aligned for optimal visibility and safety on the road.
Adjusting Horizontal Aim
To adjust the headlights on your truck, start by parking the vehicle on a level surface facing a wall. Measure and mark a horizontal line on the wall at the same height as the headlights. Then, using the adjustment screws, align the beams with the marked line to ensure proper horizontal aim.
Adjusting the horizontal aim of your truck’s headlights is crucial for safe driving, especially at night or in low-light conditions. If your headlights are not aimed correctly, it can cause glare for oncoming drivers or limit your visibility on the road. In this section, we will discuss how to adjust the horizontal aim of your truck’s headlights step-by-step.
Step-by-step Horizontal Adjustment
To adjust the horizontal aim of your truck’s headlights, you will need a measuring tape and a screwdriver. Follow the steps below:
- Find a flat, level surface to park your truck on, facing a flat wall or garage door.
- Measure and mark the height of the headlights on the wall with a piece of tape or chalk.
- Back up your truck about 25 feet away from the wall.
- Locate the horizontal adjustment screw on the headlight assembly. It is usually located on the side or bottom of the assembly.
- Turn the screw clockwise or counterclockwise, depending on which way you need to adjust the aim.
- Observe the beam pattern on the wall. Adjust the screw until the beam pattern is even and both beams are pointing straight ahead.
- Repeat the process for the other headlight.
Checking Horizontal Alignment
After adjusting the horizontal aim of your truck’s headlights, it is important to check the alignment to ensure they are aimed correctly. Follow these steps:
- Find a level surface to park your truck on, facing a flat wall or garage door.
- Measure and mark the height of the headlights on the wall with a piece of tape or chalk.
- Back up your truck about 25 feet away from the wall.
- Observe the beam pattern on the wall. Both beams should be at the same height and parallel to the ground.
- If the beams are not aligned, repeat the horizontal adjustment process until they are even.
Adjusting the horizontal aim of your truck’s headlights is a simple process that can greatly improve your visibility on the road. By following these steps, you can ensure that your headlights are aimed correctly and prevent any potential safety hazards.
Fine-tuning And Testing
Once you’ve made the initial adjustments to your truck’s headlights, it’s time to move on to the fine-tuning and testing phase. This step is crucial in ensuring that your headlights are properly aligned and functioning as they should. Fine-tuning and testing will involve making minor adjustments and road testing your adjustments to ensure optimal visibility and safety while driving at night.
Making Minor Adjustments
When making minor adjustments to your truck’s headlights, it’s important to have the vehicle parked on a level surface facing a flat wall or garage door. Start by measuring the distance between the ground and the center of your headlights. Use masking tape to mark the horizontal and vertical centerlines of each headlight on the wall. Then, using the appropriate tool, adjust the headlights by turning the adjustment screws until the beams are aligned with the centerlines and are at the correct height.
Road Testing Your Adjustments
Once you’ve made the necessary adjustments to your truck’s headlights, it’s essential to road test your adjustments to ensure that they are functioning correctly. Take your truck for a drive on a dark road to assess the beam pattern and range. Pay attention to any excessive glare or dimness and make further adjustments if needed. Additionally, consider testing the high beams to ensure they are also properly aligned. Remember to recheck the alignment periodically to account for any changes due to normal wear and tear on your truck.
Troubleshooting Common Issues
When adjusting the headlights on your truck, you may encounter common issues that can hinder the process. Troubleshooting these issues is essential to ensure proper functionality and optimal visibility while driving at night. Let’s take a look at some common problems you might encounter and how to address them effectively.
Dealing With Stuck Screws
Stuck screws can be a major obstacle when attempting to adjust your truck’s headlights. If you find that the adjustment screws are difficult to turn, you can apply a penetrating oil to loosen them. Additionally, using a screw extractor tool can help to remove stubborn screws without causing damage to the surrounding components.
What To Do If Adjustments Don’t Hold
If you’ve made the necessary adjustments to your truck’s headlights but find that they don’t hold, the issue may lie with the headlight mounting or adjusting assembly. In this case, inspect the mounting brackets and adjusters for any signs of damage or wear. Replacing these components may be necessary to ensure that the adjustments remain in place.
Maintenance And Regular Checks
Regular maintenance and checks on your truck’s headlights are essential to ensure your safety on the road. Adjusting the headlights on your truck is a crucial aspect of maintaining its roadworthiness. Properly adjusted headlights not only make night-time driving easier but also reduce the risk of accidents. In this section, we will discuss the importance of regular checks and maintenance of your truck’s headlights and how to do it properly.
When To Recheck Your Headlights
It is essential to recheck your truck’s headlights after any impact or collision. Even a small hit can misalign your headlights, making them less effective and potentially dangerous. Additionally, if you have recently replaced any of the headlight components, it is crucial to recheck them for proper alignment.
Furthermore, if you notice that your headlights are not as bright as they used to be or your visibility at night is reduced, it is time to recheck the alignment. Over time, the vibrations from driving can cause the headlight components to shift slightly, leading to misalignment. Therefore, it is crucial to check your truck’s headlights regularly for proper alignment.
Maintaining Clear Headlight Lenses
Clear headlight lenses are essential for proper headlight function. Cloudy or yellowed lenses can reduce the amount of light emitted by the headlights, making it difficult to see at night. Therefore, it is crucial to maintain clear headlight lenses.
To maintain clear headlight lenses, you can use a headlight restoration kit. These kits are available at most auto parts stores and are easy to use. Alternatively, you can use a mixture of baking soda and water to clean the lenses. Simply mix the baking soda and water to form a paste, apply it to the lenses, and rinse it off with water.

Credit: m.youtube.com
Credit: haynes.com
Frequently Asked Questions
Here are some FAQs about trucks headlight adjustment –
Where Should Truck Headlights Be Aimed?
Truck headlights should be aimed to point straight ahead without blinding other drivers. Adjust them properly for optimal visibility.
How High Should Headlights Be At 25 Feet?
Headlights should be aimed so the center of the light beam hits 2 inches below the headlight height at 25 feet.
Where Are The Headlight Adjustment Screws?
The headlight adjustment screws are typically located behind the headlight assembly. They can be accessed by opening the hood and looking for small screws or knobs near the headlight housing. Adjust them carefully to align the headlights properly.
How Far Should Your Headlights Shine While On Low Beam?
Headlights on low beam should shine around 160 to 250 feet ahead. It depends on the vehicle and its settings. Regularly check and adjust the headlights for optimal visibility and safety.
Conclusion
Adjusting truck’s headlights is very important for safety and visibility. By following the guide above on how to adjust headlights on truck and maintaining your headlights, you can ensure safe nighttime driving and avoid potential accidents. Don’t neglect this important aspect of your vehicle’s maintenance and enjoy a safer driving experience.