To check your car’s oil, pull out the dipstick, wipe it clean, reinsert it, and check the level between the minimum and maximum marks. Add oil if it’s low and ensure the oil is in good condition.
Routine car maintenance is essential for the longevity of the vehicle, and checking the oil is one of the most fundamental tasks in that process. Motor oil serves as the lifeblood of your engine, lubricating its many moving parts, preventing overheating, and ensuring smooth performance. Keeping track of the car’s oil level and condition can help you avoid costly repairs down the road.
In this detailed guide, we’ll explore how to check your car’s oil, the best practices for doing so, and why it’s so important for maintaining a healthy vehicle.

Contents
- 1 Importance of Checking Car Oil
- 2 When Should You Check Your Car’s Oil?
- 3 How to Check Car Oil: Step-by-Step Guide
- 3.1 Step 1: Gather Supplies
- 3.2 Step 2: Park on a Level Surface and Turn Off the Engine
- 3.3 Step 3: Locate the Dipstick
- 3.4 Step 4: Pull Out the Dipstick and Wipe It Clean
- 3.5 Step 5: Reinsert the Dipstick and Pull It Out Again
- 3.6 Step 6: Check the Oil Level
- 3.7 Step 7: Check Oil Condition
- 3.8 Step 8: Add Oil if Necessary
- 3.9 Step 9: Close the Hood and Dispose of the Rag
- 4 Additional Tips for Checking Car Oil
- 5 Conclusion
Importance of Checking Car Oil
Engine oil plays several critical roles in keeping your engine healthy. It:
- Lubricates engine components: Reducing friction between moving parts.
- Cools the engine: Absorbing and dissipating heat away from the engine components.
- Cleans the engine: Picking up dirt, sludge, and other debris.
- Prevents corrosion: Creating a protective layer on engine parts.
- Seals gaps: Between piston rings and cylinder walls to improve compression.
Without the right level of oil or using oil that has degraded, these vital processes are compromised. Running low on oil can lead to increased friction, overheating, and ultimately, engine failure. Dirty oil, on the other hand, may cause blockages or inefficient engine operation.
Regularly checking your car’s oil ensures that it’s at the right level and in good condition, giving you peace of mind on the road.
When Should You Check Your Car’s Oil?
As a general rule of thumb, you should check your car’s oil once a month. However, depending on your driving habits and vehicle type, you may need to check it more frequently, especially if:
- You drive long distances regularly.
- Your car is older and consumes more oil.
- You drive in extreme weather conditions, either very hot or cold.
- You tow heavy loads, which puts more stress on your engine.
Additionally, checking the oil before any long trips is a smart habit to ensure your vehicle is ready for the road.
How to Check Car Oil: Step-by-Step Guide
Checking the car’s oil is an important part of routine maintenance. It ensures that your engine is properly lubricated and can help you spot problems early. Here’s a step-by-step guide to check your car’s oil level:
Step 1: Gather Supplies
Before you begin, gather the following supplies:
- A clean rag or paper towel.
- Gloves (optional, but useful for avoiding oily hands).
Step 2: Park on a Level Surface and Turn Off the Engine
For the most accurate reading, park your car on a flat, level surface. This ensures that the oil is evenly distributed in the oil pan and prevents an inaccurate reading.
Turn off your engine and wait a few minutes for it to cool down. Checking the oil immediately after driving can result in hot oil or inaccurate readings because the oil will still be circulating through the engine.
Step 3: Locate the Dipstick
Pop the hood and locate the dipstick, which is usually near the front of the engine and has a bright-colored handle, often yellow or orange. The dipstick is the tool you’ll use to measure your oil level.
If you’re having trouble locating the dipstick, consult your vehicle’s owner’s manual for guidance.
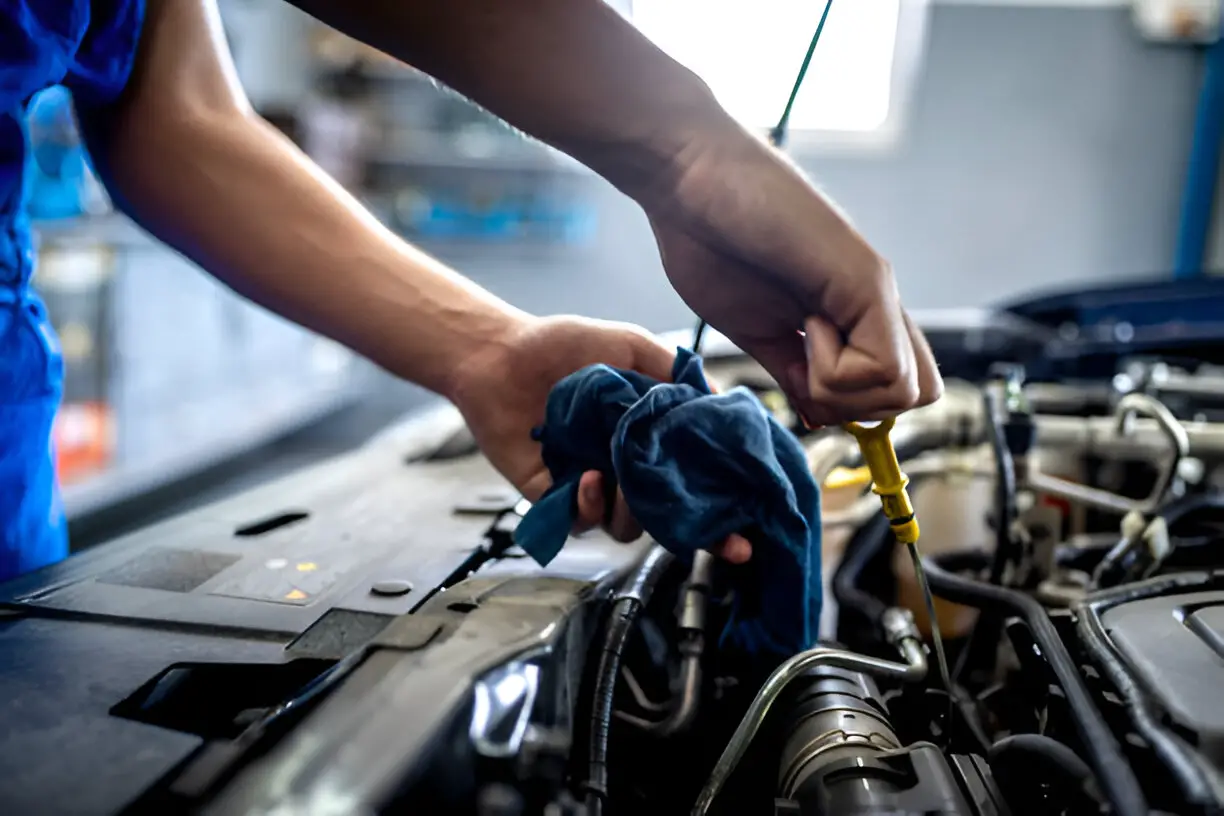
Step 4: Pull Out the Dipstick and Wipe It Clean
Once you’ve found the dipstick, pull it out completely. Using your clean rag or paper towel, wipe the dipstick to remove all oil from it. This step ensures you’re starting with a clean slate for an accurate reading.
Step 5: Reinsert the Dipstick and Pull It Out Again
After wiping the dipstick clean, reinsert it fully back into its tube. Be sure to push it in all the way, so it reaches the oil in the pan. Now, pull it out again and hold it horizontally to check the oil level.
Step 6: Check the Oil Level
At the end of the dipstick, you’ll find two marks that indicate the oil level: one for the minimum oil level and one for the maximum. These marks are often small holes, crosshatch areas, or lines.
- If the oil mark is between the minimum and maximum lines, your oil level is in good shape.
- If the oil level is below the minimum mark, you need to add oil.
- If the oil level is above the maximum mark, there might be too much oil, which can cause engine damage. In such cases, excess oil should be drained.
Step 7: Check Oil Condition
Beyond the oil level, it’s also important to assess the oil’s condition. Fresh oil is typically amber or golden in color. As it ages, it will turn darker, and eventually, it may look black. While darker oil is a sign of age, it doesn’t necessarily mean it needs changing. However, if the oil is thick, gritty, or has a burnt smell, it’s a clear indication that it’s time for an oil change.
Step 8: Add Oil if Necessary
If your oil level is low, you’ll need to add oil to prevent engine damage. Use the type and viscosity recommended in your owner’s manual. To add oil:
- Locate the oil filler cap (usually labeled “oil”) on the top of your engine.
- Remove the cap and slowly pour the oil in, checking the dipstick periodically to ensure you don’t overfill.
- Once the oil level reaches the correct mark on the dipstick, replace the cap and close the hood.
Step 9: Close the Hood and Dispose of the Rag
Once you’ve checked the oil and made any necessary adjustments, close the hood securely. Dispose of the oily rag or paper towel appropriately to avoid a fire hazard.

Additional Tips for Checking Car Oil
- Check your oil in the morning when the engine is cold for the most accurate reading.
- Use high-quality oil that meets your car’s manufacturer recommendations.
- Don’t forget the oil filter during oil changes. It plays a critical role in filtering out contaminants.
- Monitor for oil leaks if you notice a sudden drop in your oil level. Leaks can cause serious engine damage if not addressed.
Frequently Asked Questions
Here are some FAQs about how to check car oil –
1. How often should I check my car’s oil?
You should check your car’s oil once a month. However, if you frequently drive long distances, own an older vehicle, or tow heavy loads, you may want to check it more frequently.
2. What type of oil should I use for my car?
The type of oil your car needs depends on its make, model, and year. Refer to your owner’s manual for the recommended oil viscosity and grade. Most modern vehicles use synthetic or synthetic blend oils.
3. What happens if I don’t check my car’s oil regularly?
Neglecting to check your oil regularly can lead to low oil levels, which can result in increased friction, overheating, and potential engine damage. It can also cause contaminants to build up in the oil, reducing its effectiveness.
4. Can I check my oil while the engine is hot?
It’s best to check your oil when the engine is cool or after it has been off for a few minutes. Checking it while the engine is hot can give inaccurate readings and may pose a burn risk.
5. What should I do if my oil level is too high?
If the oil level is above the maximum mark on the dipstick, you should drain some oil to prevent engine damage. Overfilled oil can lead to foaming, reduced lubrication, and increased pressure on engine seals.
Conclusion
Checking your car’s oil is a simple but vital part of maintaining a healthy vehicle. Regularly monitoring the oil level and condition ensures your engine is well-lubricated, cooled, and free from contaminants. By following this step-by-step guide, you can keep your car running smoothly and avoid costly repairs down the line.