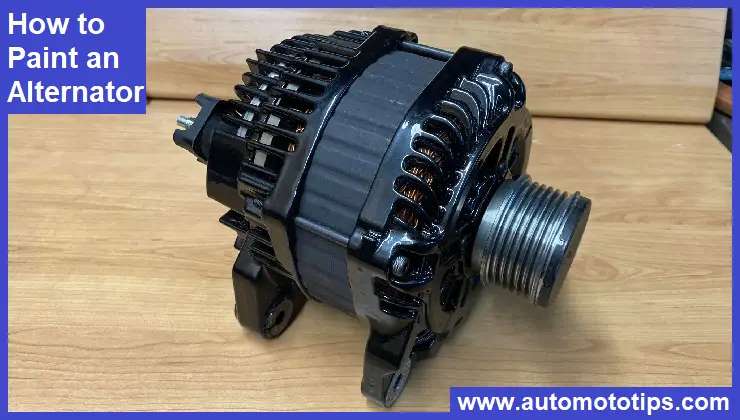
If you’re a car enthusiast or simply someone who loves to tinker with their vehicle, you know the importance of every detail under the hood. An alternator plays a crucial role in generating electrical power for your car’s battery and electrical systems. While its functionality is essential, there’s no reason why you can’t give your alternator a touch of personal style. Painting your alternator can be a fun and rewarding project that adds a unique flair to your engine bay.
In this step-by-step guide, we’ll walk you through the process of how to paint an alternator, ensuring you achieve professional-looking results.
Contents
What is an Alternator?
Before we delve into the painting process, it’s essential to understand the basic functioning of an alternator. The alternator is responsible for generating electrical power in your car’s engine, which is vital for charging the battery and powering various electrical components. It typically consists of a metal casing, pulley, rotor, stator, and diode. Painting the outer casing of the alternator does not interfere with its internal functionality but can greatly enhance its appearance.
Importance of Painting an Alternator
An alternator plays a crucial role in generating electrical power for a vehicle’s battery and electrical system. Over time, alternators can become dull, rusty, or corroded, diminishing their visual appeal. By painting the alternator, you not only improve its aesthetic appeal but also protect it from environmental factors like moisture and chemicals, extending its lifespan.
How to Paint an Alternator
Painting an alternator may seem like a daunting task, but with the right approach and preparation, it can be a straightforward process. By following these steps, you’ll be able to give your alternator a fresh coat of paint and transform its appearance. Let’s dive into the details!
Preparation
Before you start painting, it’s essential to gather the necessary tools and materials. Here’s what you’ll need:
Gathering the Necessary Tools and Materials
- Alternator cleaning solution
- Sandpaper (medium and fine grit)
- Primer
- Paint (automotive-grade spray paint recommended)
- Clear coat
- Painter’s tape
- Plastic sheets or newspaper
- Safety goggles
- Respirator mask
- Gloves
- Cleaning cloth
Preparing the Alternator for Painting
To ensure a smooth painting process and a lasting finish, it’s crucial to prepare the alternator properly. Here’s how you can do it:
- Disconnect the negative terminal of the battery to prevent any electrical accidents during the process.
- Remove the alternator from the vehicle, following the manufacturer’s instructions. If necessary, consult a repair manual or seek professional assistance.
- Clean the alternator thoroughly using an alternator cleaning solution and a cleaning cloth. Remove any dirt, grease, or debris that may affect the paint adhesion.
- Use medium grit sandpaper to gently sand the surface of the alternator. This step helps in creating a rough texture for better paint adherence. Be careful not to apply excessive pressure and avoid sanding any electrical connections.
- Once you’ve sanded the alternator, wipe away the dust and residue with a clean cloth.
Painting the Alternator
Now that you’ve prepared the alternator, it’s time to paint it. Follow these steps to achieve a professional-looking finish:
Applying Primer to the Alternator
Applying a primer to the alternator is essential as it creates a smooth base for the paint and improves its longevity. Here’s what you should do:
- Cover any parts of the alternator that you don’t want to be painted, such as electrical connectors or sensitive components, with painter’s tape.
- Place the alternator on a plastic sheet or newspaper in a well-ventilated area.
- Shake the primer can thoroughly as per the manufacturer’s instructions.
- Hold the primer can approximately 6 to 8 inches away from the alternator and apply a thin and even coat. Start with a sweeping motion from one side to the other, slightly overlapping each pass.
- Allow the primer to dry completely before proceeding to the next step. Refer to the manufacturer’s instructions for the recommended drying time.
Choosing the Right Paint
Selecting the right paint for your alternator is crucial for achieving a durable and visually appealing finish. Automotive-grade spray paint is recommended for its resistance to high temperatures and durability. Here’s how you can choose the right paint:
- Look for spray paints specifically formulated for automotive applications. These paints are designed to withstand heat, chemicals, and the rigors of engine compartments.
- Consider the color and finish you want for your alternator. Ensure that the paint you choose is compatible with the primer and the clear coat you plan to use.
Applying Paint to the Alternator
Now it’s time to add some color to your alternator. Follow these steps for a smooth painting process:
- Place the alternator on a plastic sheet or newspaper in a well-ventilated area, ensuring proper safety measures such as wearing safety goggles, a respirator mask, and gloves.
- Shake the paint can thoroughly as per the manufacturer’s instructions.
- Hold the paint can approximately 6 to 8 inches away from the alternator and apply light, even coats. Start with a sweeping motion from one side to the other, slightly overlapping each pass.
- Apply multiple thin coats of paint, allowing each coat to dry before applying the next one. This approach ensures better coverage and reduces the risk of drips or runs.
- Once you’ve achieved the desired color and coverage, allow the paint to dry completely according to the manufacturer’s instructions.
Drying and Curing the Paint
After applying the paint, it’s essential to allow it to dry and cure properly to ensure a long-lasting finish. Follow these tips for optimal drying and curing:
- Refer to the paint manufacturer’s instructions for the recommended drying time. Keep in mind that drying times can vary depending on factors such as temperature and humidity.
- Avoid touching or handling the painted surface until it has fully dried to prevent smudges or fingerprints.
- After the paint has dried, let it cure for the recommended time before proceeding to the next steps. This step allows the paint to harden and adhere properly.
Finishing Touches
Once the paint has dried and cured, it’s time to add some finishing touches to your painted alternator. Follow these steps to complete the process:
Clear Coating the Alternator
Applying a clear coat to the painted surface provides an extra layer of protection and enhances the overall finish. Here’s how you can do it:
- Ensure that the painted surface is clean and free from dust or debris.
- Shake the clear coat can thoroughly as per the manufacturer’s instructions.
- Hold the can approximately 6 to 8 inches away from the alternator and apply a thin and even coat of clear coat. Use the same sweeping motion as used for applying the primer and paint.
- Allow the clear coat to dry completely as per the manufacturer’s instructions. This typically takes a few hours.
Reinstalling the Alternator
Now that your alternator has a fresh coat of paint and a protective clear coat, it’s time to reinstall it in your vehicle. Follow these steps:
- Refer to the manufacturer’s instructions or consult a repair manual for guidance on reinstalling the alternator. Make sure you reconnect any electrical connections properly.
- Ensure that all the mounting bolts and brackets are secured tightly.
- Reconnect the negative terminal of the battery.
Cleaning and Maintaining the Painted Alternator
To keep your painted alternator looking its best, regular cleaning and maintenance are essential. Follow these tips:
- Avoid using harsh chemicals or abrasive cleaners on the painted surface, as they can damage the paint.
- Clean the alternator regularly with a mild automotive cleaner and a soft cloth.
- Inspect the painted surface periodically for any signs of wear or damage. Touch up any chips or scratches as soon as possible to prevent further damage.
FAQs (Frequently Asked Questions)
Q: Can I paint an alternator without removing it from the vehicle?
A: Ideally, it’s recommended to remove the alternator from the vehicle before painting it. This allows for better access to all sides of the alternator and reduces the risk of overspray or paint damage to other components.
Q: What type of paint should I use for my alternator?
A: It’s best to use automotive-grade spray paint specifically designed for high-temperature applications. These paints provide better durability and heat resistance compared to standard paints.
Q: How long does the paint take to dry on the alternator?
A: Drying times can vary depending on the type of paint used, temperature, and humidity. It’s important to refer to the paint manufacturer’s instructions for the recommended drying time. On average, it may take a few hours for the paint to dry completely.
Q: Is it necessary to apply a clear coat after painting the alternator?
A: Applying a clear coat is not mandatory, but it is highly recommended. The clear coat provides an additional layer of protection and enhances the overall appearance and durability of the painted surface.
Q: Can I paint the alternator a different color than the car’s body?
A: Absolutely! The alternator’s color doesn’t have to match the car’s body. Feel free to choose a color that complements your style and adds a unique touch to your engine bay.
Q: How long does the paint on the alternator typically last?
A: The durability of the paint on the alternator depends on various factors, such as the quality of the paint used, environmental conditions, and maintenance. With proper care and maintenance, the paint can last for several years.
Conclusion
Painting your alternator can be a fun and rewarding project that adds a personal touch to your vehicle’s engine bay. By following the steps outlined in this guide, you can give your alternator a fresh look and protect it from the elements.
Remember to gather the necessary tools and materials, prepare the alternator properly, apply primer, choose the right paint, and add a clear coat for extra protection. With a little time and effort, you can transform your alternator into a standout feature under your hood. Enjoy the process and the satisfaction of a job well done!


