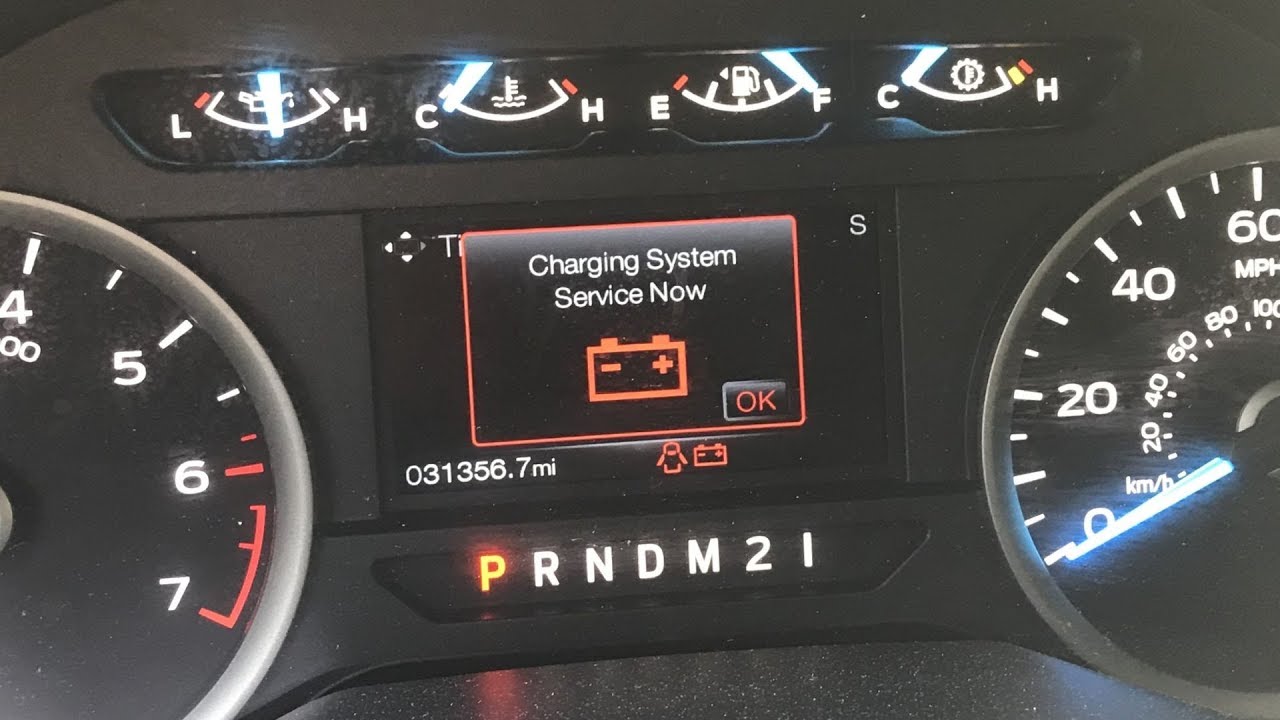
2014 Ford Mustang Check Charging System warning typically indicates issues with the vehicle’s charging system, such as a faulty alternator, weak battery, or damaged wiring. To diagnose, check the battery voltage, inspect the alternator’s output, and ensure the drive belt is in good condition.
If your 2014 Ford Mustang displays a “Check Charging System” warning light, it typically points to issues within your vehicle’s charging system, which includes components such as the alternator, battery, voltage regulator, and related wiring. While the warning may not always indicate a serious issue, it’s important to diagnose and fix any problems promptly to prevent further complications, such as battery drainage or loss of electrical power.
Identifying the potential causes of the “Check Charging System” light and how to check your system’s performance can save you from costly repairs and ensure the continued reliability of your Mustang. In this guide, we will discuss the steps to check the charging system, explore common issues that may trigger the warning light.
Contents
What is the Charging System in a 2014 Ford Mustang?
The charging system in the 2014 Ford Mustang is responsible for ensuring that the vehicle’s battery is charged and that electrical components, such as the headlights, radio, and air conditioning, receive the power they need to function.
Key Components of the Charging System
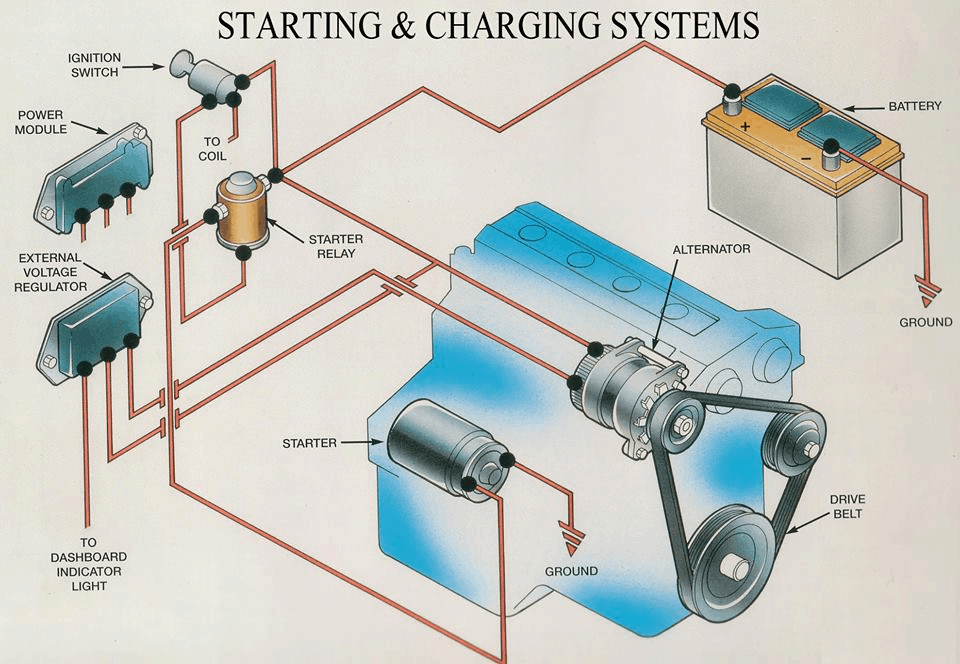
The charging system in the 2014 Ford Mustang is made up of several critical components that work together to keep the battery charged and supply power to the vehicle’s electrical systems. Knowing these components and their roles is essential for diagnosing any issues and maintaining a properly functioning system.
- Alternator: The alternator is the heart of the charging system. It converts mechanical energy from the engine into electrical energy to charge the battery and power the vehicle’s electrical systems while the engine is running.
- Battery: The battery stores electrical energy and powers the vehicle’s electrical systems when the engine is off. It is also responsible for providing the initial power needed to start the car.
- Voltage Regulator: The voltage regulator maintains the alternator’s output voltage at a constant level, preventing overcharging or undercharging, which could harm the electrical components.
- Drive Belt: The drive belt connects the alternator to the engine, allowing the engine’s mechanical energy to be converted into electricity.
- Fuses and Wiring: Fuses protect the system from power surges, while wiring connects all of the components together.
Causes of “Check Charging System” Warning in the 2014 Mustang
When the “Check Charging System” warning light comes on, it typically indicates a malfunction in one or more components of the charging system. Here are some of the most common causes:
1. Faulty Alternator
The most common culprit for a charging system warning is a faulty alternator. If the alternator isn’t generating the right amount of power, the vehicle’s battery will begin to drain, leading to power loss for electrical components.
- How to Identify: If your vehicle’s lights dim, or if electrical components (such as the radio or power windows) begin to function intermittently, this may indicate alternator issues.
- What to Do: Testing the alternator’s voltage output with a multimeter is an effective way to confirm if it’s working properly.
2. Weak or Dead Battery
While the alternator is the primary charging component, a weak or dead battery can also trigger the “Check Charging System” light. If the battery cannot hold a charge, the warning light may appear, even if the alternator is functioning fine.
- How to Identify: If your car takes longer to start or the battery is over three years old, it may be time to check the battery’s health.
- What to Do: Test the battery’s voltage with a multimeter, or have it tested at an auto parts store.
3. Worn or Loose Drive Belt
A worn, cracked, or loose drive belt can prevent the alternator from functioning properly, leading to low or erratic voltage supply.
- How to Identify: Listen for squeaking noises when the engine starts or check for visible wear on the belt.
- What to Do: If you find any damage or signs of wear, replace the drive belt.
4. Faulty Voltage Regulator
The voltage regulator controls the alternator’s output to ensure it provides the correct voltage. If the regulator fails, it could cause the alternator to overcharge or undercharge the battery, which may trigger the warning light.
- How to Identify: If the warning light flickers on and off, or if the car experiences voltage fluctuations (e.g., lights dimming and brightening), the voltage regulator could be at fault.
- What to Do: A professional mechanic may need to test the voltage regulator to confirm its condition.
5. Blown Fuses or Damaged Wiring
Electrical fuses and wiring protect and connect the charging system’s components. A blown fuse or damaged wiring can interrupt the system’s functionality and cause the warning light to appear.
- How to Identify: Inspect the fuses and wiring for visible damage, or use a multimeter to check for continuity.
- What to Do: Replace any damaged fuses or repair any damaged wiring.
How to Diagnose and Check the Charging System in a 2014 Ford Mustang
Diagnosing and checking the charging system is essential for maintaining the health of your 2014 Ford Mustang’s electrical system. By following these steps, you can identify common issues such as a faulty alternator, weak battery, or worn components that may trigger the “Check Charging System” warning light.
Tools You’ll Need:
- Digital Multimeter: To test the voltage output from the alternator and battery.
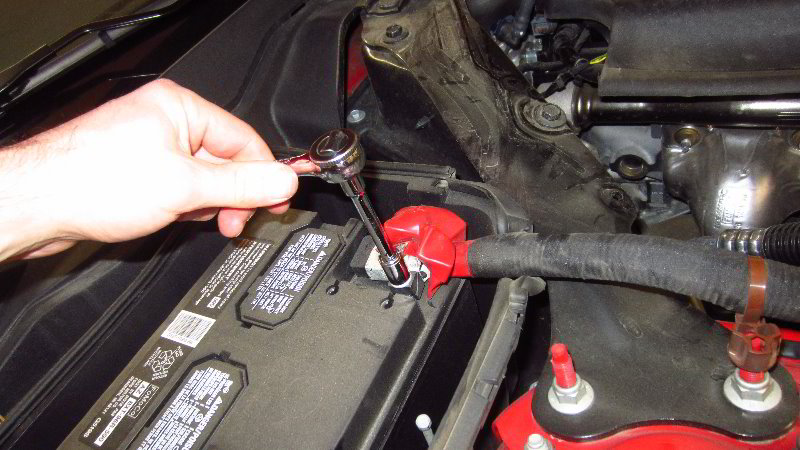
- Wrench or Socket Set: To access and remove any components, such as the battery or alternator.
- Flashlight: To inspect hard-to-see components like the drive belt and wiring.
- Safety Gear: Gloves and protective eyewear for personal safety.
Step-by-Step Guide to Diagnosing the Charging System
Diagnosing the charging system in your 2014 Ford Mustang involves checking the voltage output and ensuring that all components are functioning correctly. Following this step-by-step guide will help you pinpoint issues such as a faulty alternator or battery that could be causing the “Check Charging System” warning.
Step 1: Check the Battery Voltage
- First, turn off all electrical accessories, such as the lights and radio.
- Set your multimeter to measure DC voltage and check the voltage at the battery terminals.
- A healthy battery should show around 12.6 volts when the engine is off.
Step 2: Start the Engine and Measure Voltage Again
- With the engine running, measure the voltage at the battery terminals again.
- The voltage should increase to between 13.5 to 14.5 volts, indicating that the alternator is charging the battery properly.
Step 3: Inspect the Alternator Output
- If the alternator isn’t providing enough voltage, test it by measuring the voltage at the alternator’s output terminal.
- If the reading is lower than expected (under 13.5 volts), the alternator may need to be replaced.
Step 4: Inspect the Drive Belt
- Check the drive belt for any signs of wear or loosening. If the belt appears damaged, replace it immediately.
- Ensure the belt is properly tensioned, as a loose belt can prevent the alternator from charging the battery effectively.
Step 5: Check Fuses and Wiring
- Inspect the fuses and wiring associated with the charging system.
- Replace any blown fuses and repair any damaged wiring to restore proper electrical flow.
Preventive Maintenance for the Charging System
Regular maintenance can help extend the lifespan of your charging system and prevent costly repairs down the road.
1. Regular Battery Maintenance
- Clean the battery terminals regularly to prevent corrosion.
- Check the battery voltage periodically to ensure it holds a proper charge.
2. Inspect the Alternator and Belt
- Inspect the alternator and belt for any signs of wear or damage, especially when the vehicle is nearing 100,000 miles.
- Ensure the drive belt is properly tightened and free of cracks or fraying.
3. Address Warning Lights Promptly
- Never ignore the “Check Charging System” warning light. Address any issues promptly to avoid being stranded or damaging other electrical components in the vehicle.
4. Use High-Quality Parts
- When replacing the alternator, battery, or any other components, use high-quality parts that meet or exceed the manufacturer’s specifications for the 2014 Ford Mustang.
Frequently Asked Questions
Here are some FAQs about 2014 Ford Mustang charging system –
1. What causes the “Check Charging System” light to appear in a 2014 Mustang?
The most common causes include a faulty alternator, weak battery, worn drive belt, or damaged wiring.
2. How can I test my Mustang’s alternator?
Use a digital multimeter to check the voltage output at the battery terminals. It should read between 13.5 and 14.5 volts when the engine is running.
3. Can I drive my 2014 Mustang with the “Check Charging System” light on?
It’s not recommended to drive with the warning light on, as it may lead to a dead battery or loss of electrical power.
4. How often should I replace my Mustang’s battery?
The battery should be replaced every 3-5 years, or if it fails to hold a charge.
5. What should I do if the alternator is faulty in my Mustang?
If the alternator is faulty, it will need to be replaced. Consult a mechanic to ensure proper installation.
Conclusion
The “Check Charging System” warning in the 2014 Ford Mustang is a sign that something is wrong with the charging system, and it’s important to address the issue before it leads to more severe damage. Whether it’s a faulty alternator, a weak battery, or worn wiring, diagnosing the issue early can save you time and money.